|
Well its been about
a year and a half since my last submission to the site. Finally after what seems
an age of not doing anything with this kit I have decided to take pictures
of it and write this article, even though the model itself has been
completed for about 12 months. The kit is built entirely OOB and painted
completely by hand... no airbrushing as I haven't plucked up the courage to
buy one and have a bash with one as yet....there's still time! This is my
second 1/24 scale Airfix Spitfire that I have done and both have been an
entire different experience throughout the build. Throughout this article I will
try and put forward the pros and cons or the good bits and bad bits of the kit.
Please feel free to let me know if anyone has experienced anything similar to
what I have with the same kit.
Click on
images below to see larger images
The Fit
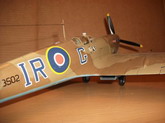
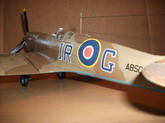
The main problem I had with this kit was the fitting of the alternate lower engine cowling supplied with the kit to make it into the MK VB version of the Spitfire. The extra parts came packaged up together on a separate sprue from the rest of the kit, and differed in colour and thickness. The extra pieces were quite a bit thicker than all of the other pieces. This became a problem as they were a lot less flexible and did not tend to fit 100% to the rest of the kit. As mentioned previously, this was to really test my patience when fitting the lower engine cowling. Once glued in place, there was an approx 3mm gap between the lower and side cowling
pieces. This was noticed prior to being glued in place, and even after hours of sanding and swearing still would not sit flush with the side cowlings. Bummer! So I had to result in filling these ugly gaps to make it look something like. If
I may say so myself, it turned out rather well. As you can see from the pictures, the gaps are no longer, and look as if nothing was ever wrong! Surprisingly the wing section fit snug to the fuselage without any problems or filling
necessary, which wasn't the case with my first spitfire... Finally the canopy piece for the Spitfire MK VB differed slightly from that of say a MK 1A, so again as expected, the fit was not brilliant! Infact it was slightly too small for the model for some reason... out came the filler once again to correct this problem, which gladly proved successful.
Paint
Humbrol Enamels were used on this kit, as with all the kits I do. I find them a trusted solid method and once you get used to a certain paint, you
don't tend to change. But as expected I ran into another problem with the camo scheme. The Azure Blue 157 by Humbrol which was used for the underside of the camo scheme on this Tropical version, I found was nowhere near a suitable match for the colour I required. Turned out almost like grey. It took me a while to mix different shades of blue to obtain the right colour, and because it was so long since I completed this model, I seem to have forgot the precise colours I used. Sorry people! the finished product, as you can see by the pictures seemed to be a close enough match for my liking, maybe a touch on the dark side?? The topside camo scheme consisted of Humbrol 29 Dark Earth and Humbrol 84 Mid Stone. The 3 colours together, although not specified on the paint guidelines, worked really well together!
Decals
For this model I used the standard decals that were in the box. Prior to application
I gave the model a coat of satin clear varnish by Humbrol to prevent the decals silvering. the decals went on well, no creases or cracking! After application and letting the model fully dry, it was given a further 2 coats of satin varnish to really bring up the colours underneath and to give the decals that "painted on" look! for the final touches, a wash of dirty thinners was washed into the panel lines just to highlight the model and give it that worn and used look! Thank you for taking the time to read my article... Any questions or advice on improving my modeling, please feel free to drop me an email!
Marc Gray
Click on
images below to see larger images
|
|