|
Hi everybody!
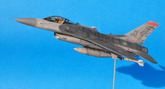
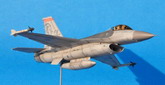
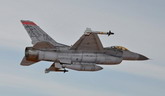
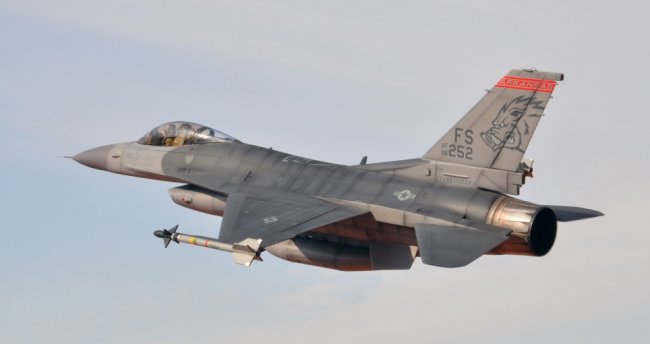
This is my 1/48 Academy F-16C of the Arkansas A.N.G., also known as "The Flying Razorbacks".
I built this Viper as a surprise to my wife's cousin: he's not a fellow modeller (too bad for him) but he's an aviation enthusiast and he likes particularly the F-16.
As I am more into WWII aircraft, I thought that building a modern jet fighter would have been a nice break from the routine and having a Viper fan in the family, well, the problem of which a/c I had to build was already solved for me.
What I had in mind was an easy, relaxing build and at a first glance the Academy kit seemed to fit the bill and at a decidedly lower price than Tamiya and Hasegawa offerings.
Though, a closer inspection left me a bit disappointed: despite the surface detail and panel lines are good enough, the fit of some parts (wing roots, engine intake and exhaust and nose cone) is really bad. The cockpit lacks any raised detail and the landing gear and gear bays are plagued by lots of ejector pin marks.
Also, the pylons and the external stores are nothing to write home about, only the AIM-9s look good after some refinements.
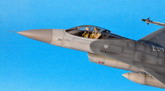
Among all these cons there are also some pros: the canopy is very well moulded without the ugly seam running along the centerline you see in other high-end kits, the pilot figure is also well sculpted and with some minor modifications you get a very convincing Viper driver. Then, the decals are well printed and very thin, a bit brittle maybe, but with due care they'll look great.
So, I decided for an in-flight model that would have saved me from the tedious work on the undercarriage and the closed canopy with the pilot strapped in the seat would have somehow prevented to notice the otherwise bare office. I also decided to omit the underwing pylons and the (questionable) external stores bar 2 Sidewinders on the wingtip rails and the centerline fuel tank scrounged from the Tamiya F-16 CJ box (as a side note, Academy provided for the two locating holes in the fuselage to install the centerline pylon but the latter is noticeably absent... Anyway, I scratchbuilt a new one from plastic sheet using the Tamiya pylon as reference).
Of course, closing the landing gear bays resulted in some more bad fitting parts to deal with... So much for my "easy and relaxing build"!
|
Click on
images below to see larger images
|
|
|
I had more fun painting and weathering this Viper.
I preshaded the panel lines and the center of some random panels with flat black. To add more variations to the livery, I have also "pre-lightened" some other panels at random with flat white. Spraying the camo grays in thin layers, the darkened and lightened panels show through and create subtle alterations in the gray tones.
I used Tamiya XF-24 for the FS 36118 Gunship Gray and Gunze H306 for the FS 36270 Medium Gray.
The nose cone was sprayed with Gunze H68 RLM74 Dunkelgrau: I know, it's a WWII Luftwaffe color but to my eye it looks real good.
I lightly buffed the model with a lint-free lens cleansing cloth then I brushed a couple of coats of Pledge (Future) in preparation for decals. They went on pretty well with Micro Set and Sol, only the larger ones needed extra care as they are very thin and prone to break.
Another coat of Future to seal the decals and I was ready for the wash with black and raw umber oils thinned with turpentine followed by a coat of Gunze Flat Clear to prepare the ground for post shading. I used my usual mix of very thinned flat clear tinted with black and brown sprayed along control surface lines, in a few random spots and streaks and some selected panels, insisting in those areas where dirt and grime buildups are more evident in reference photos.
A last coat of Gunze Flat Clear lightly buffed with a lint-free cloth sealed the paintjob.
Time to add the final bits.
The forward portion of the canopy was dipped in Future tinted with a few drops of water-soluble sepia ink and I used kitchen foil previously dipped in boiling water to plate the engine exhaust. I didn't put strange stuff (e.g. egg shells) into the boiling water to achieve the burnt metal effect, you can get different degrees of burnt metal just by varying the immersion times into the boiling water. I applied a small piece of foil to each of the exhaust petals and each one has its own subtly different appearance, I think it looks very realistic.
Lastly, I glued on the Sidewinders, the centerline fuel tank, the nav lights and I added the Pitot tube made from syringes needles of different diameters.
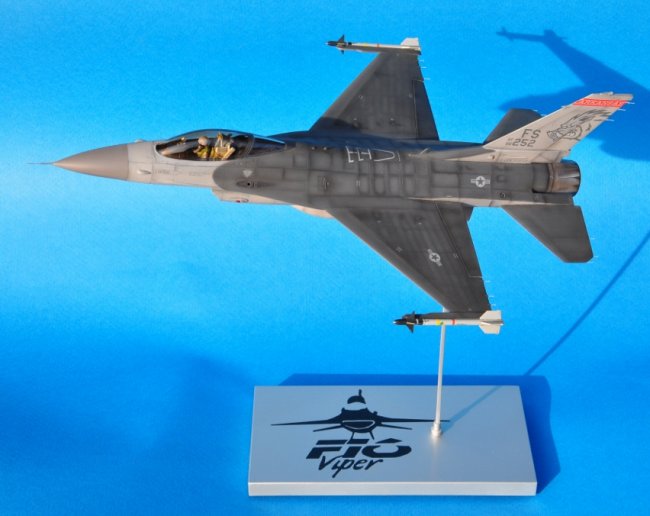
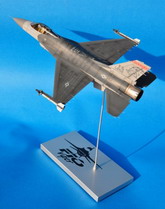
About the display stand, the base is a 18x9x1cm slab of iron with a hole drilled about 2/3rd of its
length to receive a 20cm steel square rod fastened by a Allen bolt inserted in a threaded hole in the side of the base. During the building of the model, before closing the fuselage halves, I drilled a small hole in the lower half of the fuselage between the two ventral fins where the steel rod would be inserted. I reinforced the area around the hole gluing some pieces of card stock inside the fuselage. The rod is inserted into the model with the tip of the rod resting against the base of the vertical stabilizer. It's a crude kind of bayonet coupling, but it's pretty solid.
I bent the rod tip to pose the model in a slight climbing left turn matching the pilot stance.
The base and the rod were primed with an automotive primer then painted with Tamiya AS-12 Bare Metal Silver.
I found the Viper logo on the Net, printed it on paper and carefully cut it to get a template. I masked off the base and painted it gloss black from a rattle can followed by a final coat of automotive clear paint.
In hindsight, I could have used a smaller base: the model weighs about 100 grams while the display stand is 1.6 Kilograms! It's gonna be hard to knock this guy over the desktop!
I had great fun building this model, although the building phase has been a bit frustrating. Actually, this negative aspect made me rediscover in-flight models.
You have a poorly detailed bird and you don't have time and stamina to add scratchbuilt improvements or money to throw into aftermarket parts?
Then close the canopy, gear up, full throttle and let it fly!
A big "Thank you!" goes to my father-in-law who helped me building the display stand and to my wife who patiently helped me during the photo session.
My wife's cousin did love his Viper! I hope you have enjoyed seeing it, too.
Best,
Lorenzo
|
Click on
images below to see larger images
|
|
|
|
|
|