|
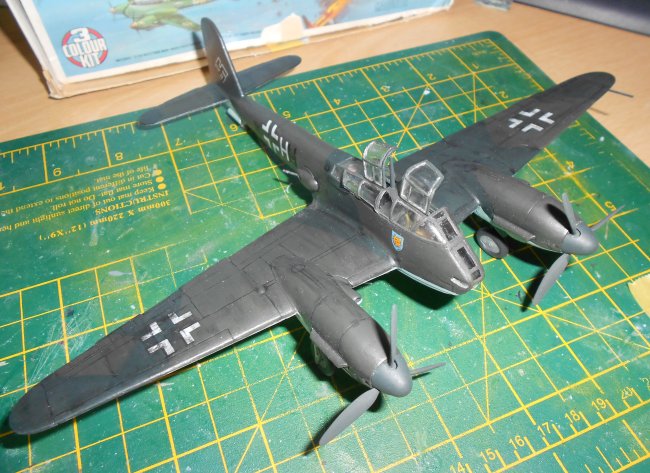
This is an article on the building of the Matchbox 1:72 scale Messerschmitt ME410. This aircraft was a WWII German heavy fighter and fast bomber, of which approximately 1200 were built. The Matchbox kit of this hails from 1976 and the version in my stash is an original boxing from this era. It is old enough to include swastikas on the original and well preserved decal sheet. As with all (to my knowledge) Matchbox kits the level of detail included is negligible, this kit is presented on 3 sprues of different colours, with the plastic itself being nice and workable, albeit with Matchbox canyon like panel lines. Two kit aircraft and decal options, a ME410 A-2 and B-1. I chose to build the B-1 version.
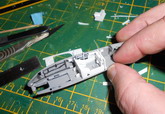
As the kit itself is lacking any real detail, and the canopy consists of a lot of glass, I decided that the cockpit area required something to give it some interest. I decided to scratchbuild a cockpit, as I am reluctant to purchase expensive aftermarket parts for something I picked up on eBay for not a lot of money! As the overall construction seemed to be fairly conventional with two fuselage halves, root join for the wings etc. My work could proceed on the fabrication of the cockpit. In my research on the interior of the aircraft I found quite a few pictures of models of the type (mainly 1:48) with the cockpit canopy opened. I decided this would suit my
scratchbuilt cockpit.
|
Click on
images below to see larger images
|
|
|
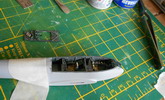
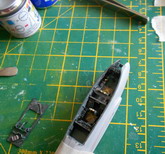
The complete interior was built on the original floor (which required a cut out on the forward end for the pilot), and was built using only the pictures I could find on the internet, marking out a sidewall with a Sharpie and “dry” fitting parts to one of the fuselage halves. Various pieces of sheet styrene and square styrene rod were used to fabricate the cockpit. A small amount of stretch sprue was used for things like the control column. Once complete the cockpit parts were painted in
Humbrol enamel and dry brushed with grey and silver. The instrument panels were sourced from pictures on the internet and printed to 1:72 on plain paper (using trial and error for size), and then cut out and glued with PVA. Seats have had masking tape seat belts added. Overall, I am satisfied with the look of the cockpit.
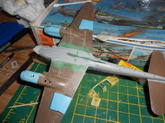
The main construction was fairly conventional, filling was required on fuselage seams and wing root joins. Overall this was not a significant effort. After completing the constructions the canopy can be added. As I had cut out the windows that open, I also had to manufacture replacements from clear plastic sheet. The original canopy is thick and the material loss from sawing out the openings was severe. Once the canopy was glued in place it was filled at the join with Squadron Green Stuff. I then masked off the canopy for the paint process.

Overall, the model was painted with Humbrol enamels. Priming was done by brush with Hu1 Grey primer as this eliminates the three colours of the plastic. The underside was painted and once dried, Tamiya masking tape used for the upper/lower demarcation. The main camouflage on top was brushed on using Hu241 and Hu242 (part of Humbrol’s newer range of WWII colours). After painting was complete, two coats of future were applied as a base for the decals. The kit decals were used and went on very well with Micro Set and Sol to help them along. Further coat of future was then applied. I then weathered the panels lines using Humbrol’s enamel weathering wash. Final sealing on top was performed with Humbrol Matt Clear.
All the fiddly bits then got glued on using CA, a final paint inspection was performed to see if any blemishes need touching up. Having found none, this model is now sitting on its shelf.
Dan Croke
|
Click on
images below to see larger images
|
|
|
|