|
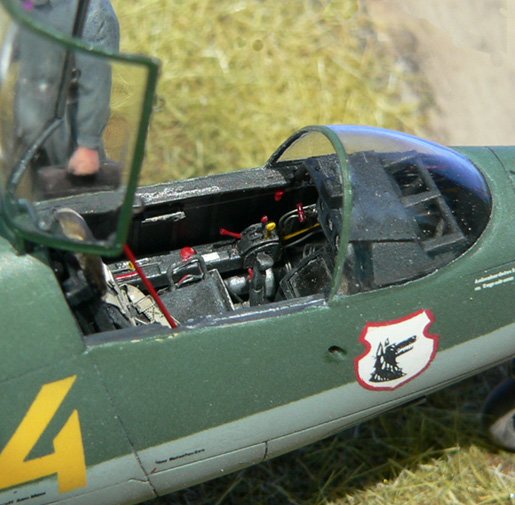
Here is my He-162A-2
"People's Fighter". I built this AC last spring just after the
re-release by Dragon. Having never before made a Dragon model, I was pleasantly
surprised with the overall quality of this kit especially the addition of some
PE parts for the engine, landing gear, and cockpit. I don't recall any major
problems with the fit and found many options present for scratch building. I
started out planning to just add some details to the engine, but I ended up
supplemented the kit parts with an Eduard detail set, True Details
wheels, and a Squadron canopy. From there, I kind of went crazy. Since I
wanted to display the AC with the engine exposed, I added a lot of scratch built
details to the engine. I wanted both sides of the engine to be visible so
based on a reference photo, I made new hinges so the engine cowlings could
be fully opened. The wheel wells were modified by adding hand made springs
to the landing gear as well as as much plumbing as I could manage. Photo
credits for this submission go to my brother, and I really appreciate him taking
these photos, but he controlled his new camera and therefore the
composition of the photos, so no pictures of the wheel wells or cockpit
were taken. During my research, I found a good picture of the left MG
compartment, so this was created by cutting open the fuselage and then building
the compartment walls using sheet styrene. The left MG 151 itself was made
by forming a master and then casting a resin MG, adding control wires, and then fabricating
the compartment hatch from sheet brass. In hindsight, I really
don't know why I made the resin casting of the MG instead of just using the
scratch built MG, but it seemed like the thing to do at the time... In contrast
to the photo in the Aero publication, I positioned the compartment hatch
on the bottom. This allowed a better view of the MG and also the position
in the majority of my reference pictures. The MG 151 barrels are stainless
steel tubes from needles. The original pitot tube appeared too long and thick to
my eye when compared to my references, so it was shortened accordingly. I used
copper wire hinges to attach the canopy to the airframe since I did not like how
clunky the kit attachment points looked.
|
Click on
images below to see larger images
|
|

|

|
I used Tamiya
acrylics to paint the model and weathered it with oil washes. I don't recall
which RLM colors I mixed but I tried to reflect the color variations created by
material shortages late in the war. The tail assembly and cowlings are a
different RLM color than the fuselage to reflect their being subassemblies
constructed at different locations. I used the kit stencil decals and either
make or scrounged the remainder of markings. The JG 1 squadron badge was scavenged
from another decal sheet and all other markings were hand made using stencils. Presently
a new aftermarket decal sheet as available for the He-162 that would have
been helpful and I could not get my hand on the older Aeromaster sheet (well, at
least not for less than $60 USD on ebay!).
For the diorama base
I used dry wall compound as the groundwork. It has so far stood up
without problems and proved to be easy to use to recreate the concrete. The
airfield cart is from Verlinden and was fun to build. I scratch built the frame
from styrene rod and added a sheet brass bucket. The figures are all
Verlinden. The AC canvas covering lying next to the AC is made from aluminum
foil.
I made this model last year and don't recall everything about
the build, however it was an enjoyable project and has turned out to be one
of my favorites. I hope you all enjoy my presentation as much as I enjoyed
making this model!
References:
Heinkel He 162, X Planes of the Third Reich Series, David Myhra,
Schiffer Military History, 1999.
Heinkel He 162, The Aero Series, Aero Publishers, Inc., 1965.
Tim
|
Click on
images below to see larger images
|
|

|

|
|
|