|
Here
is the B-29 Foil Project, as I call it. I didn’t start out with the
intention of submitting an article so there are a few “photo gaps” in this
submission. I might add that this project really makes the point of my
tagline…” Progress?! ...Sure, I've made lots of progress. I know hundreds of
things that don't work.“ So, so, true when you’re experimenting with
something you’ve never done before.
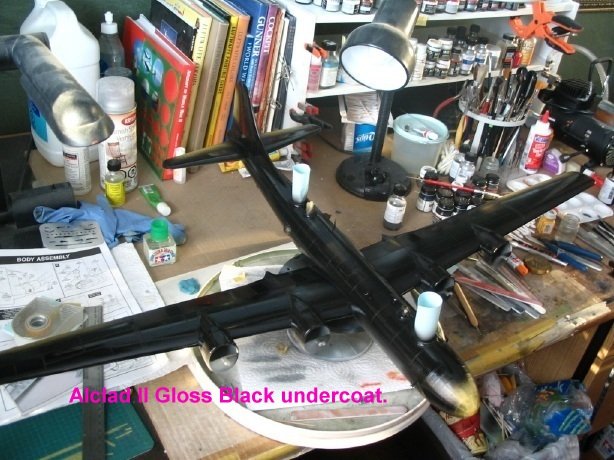
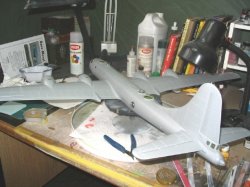
| For the most
part, this is the assembled kit with the rivets applied. Just prior to
painting.
A
lot of what’s here is taken from my posts in the ‘In Progress’ section,
although a little more refined for the most part. I need to get a couple of
statements out of the way right up front. I have never attempted to put foil on
any kit I’ve done in the past. The B29 was my first (I treated it with
respect).
|
Click on
image below to see larger image
|
|
|
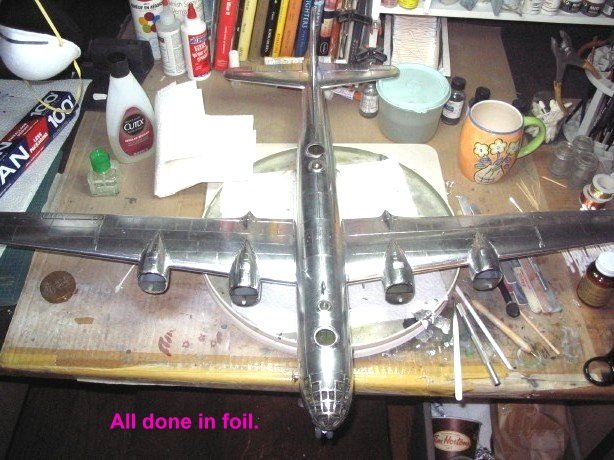
The reason I chose foil was because I had painted the kit and the
paint turned into a huge problem for me. Ironically, the kit has probably $40
bucks worth of Alclad II on it and it looked like crap, yet 25 cents worth of
foil made it look like a million.
Against
my better judgment I used Alclad’s Gloss Black as the base coat, I’ve had
many problems with it in the past. First, it never dries, at least not for me.
Many fellow ARC’ers have told me that “if I thin it with…”, “if I coat
it with…”, “if I …whatever” then it will dry. I tried them all and
nothing works for me. Either I’m doing it wrong or some mystical force is
working against me. I just can’t figure this stuff out! Secondly, I find that
in order to get the black gloss finish I want I’m spraying on many coats
making the black layer very thick. Add this fact to the fact it never dries and
you have a paint job with a nice thick under pad, nice for walking on… bad for
touching.
|
Click on
images below to see larger images
|
 |
 |
From
what I remember about the building of the kit there were no unusual problems.
The cockpit glass took some time to get right though. Plane has one radius,
the glass has another. I tacked it by setting the pilot side in place with
Tamiya Extra Thin wiggling the glass in place until it was flush and then
letting it dry overnight. Next day, I glued the up to the top of the cockpit
glass wiggling until it was flush, clamping it down and then letting
it dry overnight. What’s left on the last day is a tension filled piece
of plastic you clamp in place to make flush, while using Tamiya Extra Thin
to melt the edge.
The
decals went on like usual for an old kit like this. Lousy. I put a coat of
Future on the bird, decaled, Future again. Of course the decals in the kit are
too thick and almost immune to decal setting solvent (and I tried 3-4
kinds). I was kind of upset by this because after all the hours of work the
decals were making it look like crap. But in the end they worked out ok,
but not perfect. If I were to do this kit again (and I won’t... unless offered
lot's of money), I would spring for aftermarket decals.
I also
used Future as a sealer to keep the edges of the foil down and for general
protection of the kit. Lesson here is, washing the kit with soap and water may
have helped the Future cover the kit better. Even a drop of dish washing liquid
in the Future to break surface tension may have helped. Getting 100% coverage of
the model with the Future was time consuming. It doesn’t like aluminum foil. I
applied Future with a brush like I always do.
The
only other thing about the kit that stood out for me was the lack of
rivets. Something this large just has to have some rivets! I took my pounce
wheel in hand and ran rivets over the whole plane except for the undersides of
the wings. The rivets are the wrong size with the wrong spacing in wrong places
and done freehand. You perfectionists will cringe right about now. There
are several other glaring errors on this B29, especially with the decals.
But you know what? I think it looks pretty good and the guy I made it for
couldn’t be happier. Go figure.
Another
point I’d like to make is; I now feel that foiling an aircraft is in many
ways, easier than painting it. No, really. Prep work is much less, finger prints
don’t matter, masking isn’t necessary, nothing to clean, if I make a mistake
then peel off the piece and try again, if dust or dirt gets under the finish
then peel off the piece and try again. Airbrushing mistake? Just wipe it
off and start again. Finally, there is no time pressure. I don’t have a cup of
paint to worry about. I can add one piece of foil and then go watch some Columbo,
come back an hour later and add one more. It’s a ‘leisure’ job. (If you
don’t know who Columbo is, you’re too young to foil an aircraft).
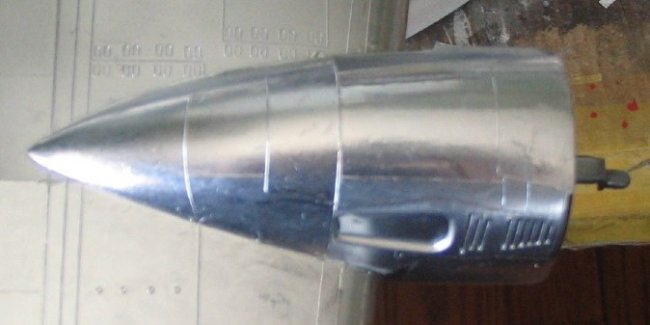
Just
dive in. You'll find that you work out most of the problems and methods pretty
quick. The biggest trick is not to get discouraged, just work through it. I
started with the engine nacelles. I figured if I could get them to look
acceptable to me the rest of the kit would be a breeze. The first one took hours
to do and pushed me to the brink of giving up because I couldn't make it look
the way I though it should. It was only when I got to the 4th one that I
actually figured out the best way to do it. The difference between the 1st and
4th was pretty significant. I’ll bet there are 15 separate pieces of foil
on each of those nacelles.
|
Click on
images below to see larger images
|
 |
 |
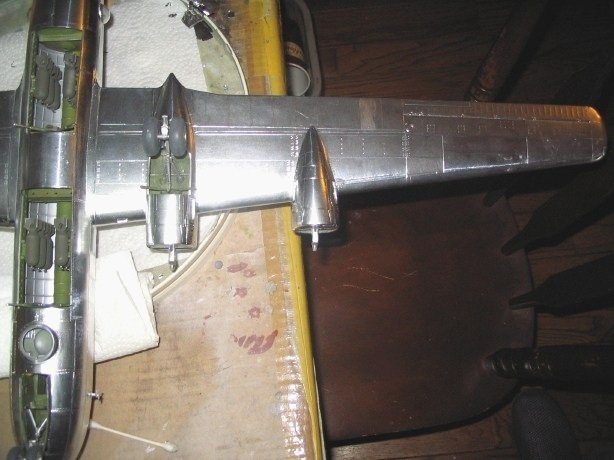
Here’s my last piece of advice about looks. There are generally two things to
deal with. The first one is creases, the second is seams. You are going to have
both. Now you can make the most important decision… fight them, curse them, or
embrace them. Accept them. No real
aircraft is perfect. When I started looking at photos of the real thing and
some visits to see actual aircraft, I realized that they are consumed by marks,
scratches and stains. Trust me when I say, no one will care when they’re
looking at the finished piece. They won't even notice them. Mine is loaded
with seams, scratches, marks and wrinkles I had to burnish out. Resist the urge
to focus on problems, leave it and move along. Come back later and come back
with a positive attitude. Judge your work when the whole thing is complete.
If
you really want, you can buff the aluminum foil. This will remove almost all the
marks (Tried it on some test pieces); you can get a mirror-ish finish if you
want it. Personally I prefer the marks and scratched mine up to better reflect
the real aircraft. That’s my story and I’m sticking to it.
That
said, on we go. Here's what I used during the process:
Q-Tips,
(although when I discovered the cuticle tool, I stopped using these for the most
part).
Replacement
art knife blades. Sharp blades = nicely trimmed foil, dull blades = Hell.
Metal
Leaf Adhesive (use liquid, not spray) at Loomis or some other arts & craft
store. The reason you are going to use this glue is because it dries level,
semi-hard, and stays tacky for a week at least. This comes in handy when you are
burnishing down an area and discover a hair under the foil, peel back, remove
hair, and keep going. I don't use the spray because well, it's just not good;
Goes on too thick for one thing. There were several other problems with the
spray. The bottle glue is so much better. The foil stays where it is put and
doesn't 'slide' around at all (like Bare Metal Foil does).
Aluminum
foil. I used everyday Alcan Aluminum Foil. There is apparently an ‘oven’
foil which is thicker then the usual foil. I would guess this might be a better
choice. Worth a try anyway.
Cutex.
Removes the glue without damaging the plastic.
Burnishing
tools:
These
consist of the usual metal thing with the round steel end. Also, I bought
a plastic cuticle pusher thing (ask your wife, girlfriend etc.) There is a
specific one I prefer but I don't have a photo of it. PM me and I'll send
you one.
If
you don't have a top quality brush about 1.5" to 2" wide go get one.
This is to apply the glue to the foil. If you use a cheap brush you'll spend
more time picking out hairs then actual foiling! Trust me on this one.
Foiling
rule #1: Glue goes on the foil, not
the aircraft.
Rip
off a piece of foil say a foot square. Pour a small amount of the glue on the
dull side and using your good brush, spread out the glue. You will notice that
little pockets will open up on the foil where the glue is sort of repelled; much
like a little oil repels water. Just keep brushing until these pockets close up.
There can be no areas without glue.
After about 10 minutes I start working with it.
The
pieces I cut are generally 25% larger than the area I'm trying to cover, stick
mostly with the natural panel lines on the aircraft.
Here
is something to consider. If you have the patience, you can 'work' the foil into
and around things you think are impossible. On the B29 I worked one piece of
foil half way around every turret. When I started, it seemed impossible, but
slowly working the foil seems to stretch it into area’s I thought it
wouldn’t go into. Occasionally you will use the art knife slit up the foil to
release tension and allow for a bit more stretch. Working around the turret took
about 30 minutes each half, compared to 2 minutes for a normal panel. If you
don't have the patience, then you pick up a few extra seams. There's nothing
wrong with the seams don't let them discourage you. There really not noticeable
from about a foot away.
The
trick seems to be one or maybe two panel sections of the aircraft at a time,
really no more than a piece about 1"x 3" maybe 2"x 3" in the
case of the B29. I have gone longer when I got lazy, 5" - 6" if needed
but then no more than an inch, inch & half wide. Once the size has been cut
I generally bend the foil into a slight 'U' shape when working with normal
semi-flat areas. Working from the centre of the panel out I use a cuticle thingy
(or a Q-Tip) to rub the foil down. It picks up the detail amazingly well. The
cuticle-pusher thing works out any creases that may have formed as well as
working in the last of the detail. It also allows for more pressure to be
applied to the foil.
When
rubbing down the foil, there will be times (usually on compound curves) where
you will get a crease in it. If it wasn't all that big, I chose to burnish
down the crease with the steel burnishing tool. I also use this tool to burnish
down the edges of the foil where I had overlapped it (seams were butted at the
natural panel lines). Burnishing really hides the edge and most creases, but it
also 'polishes the foil in the process.
Different
colours in the foil can be achieved by boiling the pieces in water with
eggshells. Fifteen seconds for small changes… 5 minutes for big changes. That
burnt look of the foil I placed around the exhaust pipes was just boiled with
eggshells, no weathering or airbrushing. I think it was Peter Doll that gave me
that tip. The different colour panels on the wings, ailerons, rudder, and
elevators were the result of putting the dull side up. I airbrushed some
oil and smoke on the kit. The one thing I didn't spend a lot of time trying to
figure out the answer too was how to weather the kit like I would have if it was
painted. Next project. P.S. thanks to those of you that convinced me to remove
the smoke I put around the engine nacelles, in an earlier post.
|
Click on
images below to see larger images
|
 |
 |
Would I foil again?
You
betcha. Once you get through the first project 95% of the fear is gone. You know
what to expect and you know how to get around problems. Like I said earlier, at
this point I think it is just a lot easier to do; Although I would never tackle
another B29 because it is just too, too, big to work with comfortably. A nice
Mustang or Jug would be far easier.
To
all of you hesitant to venture into the realm of the unknown; to all of you who
picked up some foil and made a meagre, feeble attempt at foiling a ‘test’
piece, then gave up cause “it was hard”, to all of you I say… Go to the
kitchen and push aside your fears and your wife (yea, like your wifes in the
kitchen…), pull out that roll of kitchen foil and hold high above your head
and scream… “Hell, I’m not going to let you beat me this time”. You can
do it, you’re a modeller!
shhhhhhhhhhh!
not so loud.....
Larry
|