|
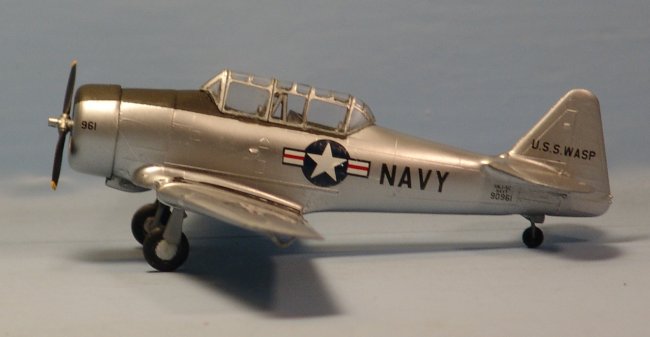
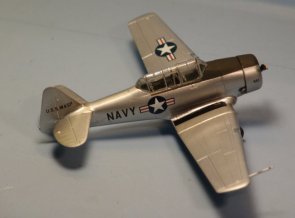
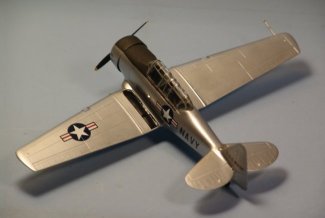
This is the excellent Academy
1/72 T-6 G Texan kit built as a US Navy SNJ-5 C operating from the USS Wasp
circa 1950. I’d originally set out to build a USAF T-6, but several serious
“decal malfunctions” ultimately convinced me to go with the much simpler
Navy markings. The actual “conversion” was fairly simple; all I did was sand
off the molded-in base for the radio “hump” behind the cockpit and omit the
port-side radiator scoop. Some additional sanding and re-scribing (especially of
the panel with the molded-in outline for the radiator scoop) would have given me
a more accurate model, but by the time I realized this I’d managed to apply
one of the best paint jobs I’ve ever done, and sometimes you just don’t mess
with success!
Other
than the cosmetic modifications for the SNJ and a pair of Eduard
photo-etch seatbelts (sourced from a couple unused Zoom sets), the kit was
built entirely out of the box; it is superbly engineered and goes together
with no major fit issues. I had to fill one small gap at the starboard
wing root using Tamiya basic putty and a Q-Tip soaked in Isopropyl. After
sanding off the radio hump I found it necessary to fill the fuselage seams
with CA and accelerator smoothed out with Flex-i-files, but otherwise the
building went without any major glitches.
My
references for this particular plane show no external radio masts or
antennae. While many contemporary SNJ-5s had the tall mast ahead of the
windscreen and a smaller whip antenna on the fuselage spine directly
behind the cockpit, I opted to leave these off for the sake of a clean
build.
Painting
I
used a number of different paints and techniques to complete this model;
hand-brushing Polly Scale US Interior Green, US Olive Drab and Engine Black
(from the PS Railroad Colors line) for the cockpit and interior with Tamiya Flat
Aluminum and Gunze Steel dry-brushed highlights. I applied Model Master Acryl
Gunmetal and Tamiya Metallic Gray to the engine and dry-brushed with Citadel
Chainmail. Bare Metal Foil was used for the (rather poorly defined) main wheels.
The
natural metal finish for the exterior was achieved by airbrushing Citadel
Mithril Silver. This is the absolute best acrylic metallic paint I have ever
used (and I’ve tried just about every technique there is for doing NMFs!); it
sprays beautifully, cures hard as nails, can be buffed and masked with no
“pull-up” issues, requires no additional gloss coat for decaling, and looks
realistic! (Thanks must go here to Kevin “Smithery” Smith for suggesting
this wonderful paint in the ARC Tools n Tips forum).
I
masked the cockpit and wheel wells with bits of wet paper towel and a little
Tamiya masking tape, then applied a couple thin coats of Tamiya Gray Primer from
a rattle can (priming is absolutely essential when using Citadel acrylic
metallics as I learned from bitter experience!) I
then sanded out any surface imperfections with 1800 and 2400 grit Micromesh
abrasive cloths. I thinned the Mithril Silver with Tamiya X-20 A thinner at a
ratio of 70 per cent thinner to 30 per cent paint and sprayed three thin coats
at approximately 12 PSI. After the paint had dried I buffed it out with SnJ
Aluminum Powder for a more realistic sheen.
Once
the Mithril Silver was buffed out and thoroughly cured, Tamiya masking tape was
used to define the area for the anti-glare panel ahead of the windscreen. I
sprayed several thin coats of Tamiya Olive Drab, trying my best to avoid
over-spray. Hindsight being 20/20, I would highly recommend spraying at least
three (and possibly four or five) coats, as it has a tendency to chip off rather
easily, revealing the Mithril Silver below.
Masking
the Greenhouse
I
treated the three-part greenhouse canopy as a model in its own right; taking a
day to mask and paint it with as much care and precision as possible. I used the
excellent Eduard Kabuki-tape die-cut mask for this project and was quite pleased
with the results. To hold the clear parts still while I worked and make it
easier to see contrast between the “glass” and the molded-in canopy framing,
I first filled each part with a “loaf” of poster putty (a Blue Tac knock-off
in this case), using an X-Acto blade to trim it at the edges so no putty
overlapped the actual areas to be painted (this also provides a built-in
“mask” for the canopy interior). I then mounted the parts on my “third
hand” device, simply impaling the claw into the putty. This allowed me to use
both hands with a tweezers and X-Acto blade to get the pieces of mask into place
more accurately.
Once
the canopy and windscreen were masked, I mounted the pieces on Q-Tip stems (with
the “buds” cut-off at both ends) bent to convenient angles and inserted into
holes in my Tamiya spray stand. I airbrushed two coats of Polly Scale US
Interior Green, following this with three light coats of Mithril Silver (left
unbuffed for contrast). Once thoroughly dry, and still filled with poster putty,
I carefully removed the masking. I removed the poster-putty loaves and cleaned
the greenhouse interior with some Novus #2 as the putty left a slight residue. I
waited until all else was complete to add the canopy to the model.
Decals
I’d
specifically purchased a set of Carpena decals (from Portugal) for this build;
the sheet included markings for two USAF T-6s, as well as two US Navy SNJ-5s and
one USMC bird, I practiced with these decals (using the brand-name and sheet
title) on some scrap kits which I’d first painted with Citadel Mithril Silver.
Unfortunately, I didn’t experiment quite enough, and found out too late that
there are several things you should NEVER do with Carpena decals!
Some
of the larger decals tended to break apart on application. I tried remedying
this with a coat of Microscale Liquid Decal Film, but this made the decals too
rigid, and no amount of Micro Sol would force them to settle down. Dipping the
separated decals into a bath of Future didn’t help either; the decals remained
just as rigid as before and the Future seemed not to agree very well with the
Citadel paint. Let’s just say I ended up stripping three sets of decals off
this plane and had to start over from scratch twice.
Finally
I got smart and opted for the simple, spare US Navy markings, borrowing the
Stars and Bars from a Superscale F-86 sheet, using only the “Navy” and
specific ID markings from the Carpena set. I thinned down the aft step on the
port side as one of the Stars and Bars went directly over it and I felt it would
settle down more easily (and not really be noticeable anyway). This time all the
decals went on without any fuss; I even ended up using some of Academy’s awful
kit-supplied decals for the black step-ways on the wing-roots and, amazingly,
they turned out fairly well.
Click on
images below to see larger images
Conclusion
Every
build is a learning experience. Often times you’re forced to measure
failure against knowledge gained, chalk up the FUBARed finish or ruined
decals to another step on the learning curve, hoping you can apply its
lessons to future successes. It’s nice, every once in a while, in spite
of difficulties to get it right while still having fun! I had a lot of fun
building this model, and I hope you enjoy seeing it here!
This
is my first article on ARC and I’d like to mark the occasion by
acknowledging the fantastic resource it truly is; I am always impressed by
the great depth of knowledge here and the patient willingness of so many
to offer their wisdom and advice; I know I’ve personally benefited from
it many times, and have become a much better modeler (often in spite of
myself!) because of it. Kudos and thanks to you, Steve Bamford, for this
wonderful site; and thanks to all the great guys on the ARC forums!
Jerry
(Old Blind Dog)
|