|
Lesson
learnt from this kit: A quick kit is a good kit, unfortunately there are no
such thing as quick kits.
It had been a long time between kits. As a avid builder of aircraft models
during my childhood many a weekend was spent mowing the neighborhood lawns
during the peak of a scorching Australian summers day in order to raise
enough money to buy a tiny little tub of Gunze paint. (H13 Flat Red….. I
would mow the lawns of all the houses in my street and a bit of Mrs.
Morgan’s flower bed for a tub of H13 Flat red). However with the onset
of late adolecance and the distractions or side affects that come with it,
my own 72nd scale finance department slowly found itself having
to reallocating funds from its production line towards more “1/1
scale” investments. With a minimal cash flow, less time available and
the appearance of a lawn mowing contractor to my neighborhood. The
inevitable happened and the production of model planes ceased. Looking
back now I would like to think that it is entirely coincidentally that
around this same period of time the
tub of H13 flat red was spilt onto my mothers off white carpet. This
“Pink Patch incident” dovetailed nicely with a letter she received
from my High school English teacher wishing to express his concern that I
listed my favorite book as the 1993 Hasegawa catalogue. The Die had been
cast, The flat coat had been sprayed, the writing was on the wall and the
stain was on the carpet. No more planes. – Insert harp sounds and
blurred wavy effect here.
Alas as Shakespeare once said “the smell of paint thinners runs deep.” or
something to that affect. I had begun to find myself uncontrollably flicking
through copies of Fine Scale modeler at the newsagents. Wedging it between a
pile of girlie magazines. Hoping no one would notice my uncontrollable habit.
Then along came Mr Bamfords wonderful website. I could get a daily modeling fix
here. Then it finally happened. I brought a kit…then another one and another
one, now I cant stop! Which brings me here today. Bare with me people I am
getting to it. Now I have my own house in New Zealand
with two cupboards. One cupboard is for clothes the other is for kits.
The kit
cupboard is full. I had a choice to make. Start making kits or become a
nudist…… Taking New Zealand’s cooler climate into account I choose to make a kit.
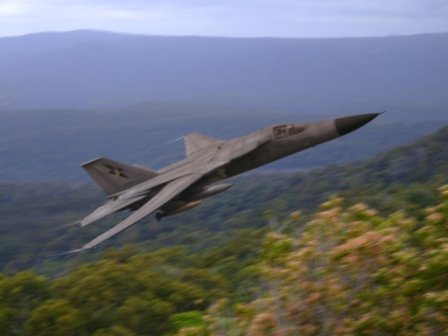
The
Academy F-111 kit in its large cupboard filling box is completely inoffensive to
look at. It's recessed panel lines are very shallow but they are there, the grey
plastic is of a good quality and looking at it on the sprues it appears that it
can be built up into a impressive version of the F-111C/G or “pig” as it is
known in Australia.
Just
a note to anyone who is pondering building a Pig. You can actually build either
the “C” or “G” version of the F-111 from the same kit. I actually
brought a F-111C, but built it up into a F-111G using the different engine air
intakes. I hope that make sense to most of you. If not just nod, smile and say
Ah-ha like my girlfriend does whenever I point vaguely skywards at some passing
dot and say something like “the figure eight exhaust and blue blades makes it
a B not B2.” While on that topic is there anyone else here that feels
personally offended when Helicopter sound effects at the movies don’t match
the Aircraft on the screen? Sigh.. I’ll move on
Click on
images below to see larger images
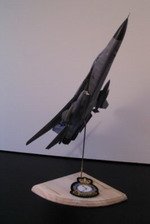
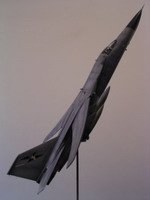
To
make the build faster I decided to mount the “pig on a stick”,
therefore not having to build the fiddly landing gear and their slow
drying white painted parts. My inspiration for this comes from Gary
Wickhams wonderfully built and mounted kits. He is a regular on this site
and if I could build my kits half as good as his I would be very happy.
To
make the machine look like it was flying I took some small off cuts of
aluminum sheets and bent them into a upwards arc to use as a internal
frame to give the model wings a look of being under load. The upper and
lower wing halves were glued over these “arced stiffeners” and clamped
in place. The wings were fused together to form a single piece wing and
installed onto their mounts in the fuselage. This kit allows itself to be
built with fully functioning swinging wings. I tend to find that if
something can be moved backwards and forward, then people keep moving it
backwards and forwards, then it breaks. I am sure we can all think of that
one notorious kid that would break a swinging wing model kit. The wings
need to be secured together at the right angle where they joint. If they
aren’t reinforced in the center where the Left and Right hand wings
meet, then they tend to sit at a unconvincing dropped angle that makes the
kit look awful. It's important to reinforce the wings so they sit at least
level.
I
was already aware of the biggest concern regarding this kit. The joint between
the cockpit and the rear 2/3rds of the aircraft is criminal. Not sadistically
criminal like the Airfix Buccaneer that stares at me with its evil misaligned
fuselage half’s from the bottom of my kit cupboard, but criminal never the
less. Prepare for this one people. I used some plastic tabs and cut some sprue
to use as cross members to support the upper half of the rear fuselage join.
Even with all the preparation I still felt like the Summer of 2006 was spent
sanding and re-scribing the putty from my pig.
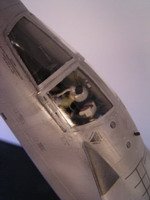
If
its flying, it will need pilots. My two crew were borrowed from two Hasegawa
F/A-18’ kits residing above the evil Buccaneer kit. The Hornet kits come with
two complete pilots even if they are single seat examples. A nice little
expensive bargin if you ask me. The pilots were removed from the kits, exorcised
of any evil Buccaneer karma in a short sayonce and quickly rushed through a
F-111 conversion course. Their oxygen hoses were removed and replaced with
Guitar strings. Pig pilots masks appear to have the hoses attached side on,
Almost Scuba style. Allowing the pilots head a greater field of movement. Shame
these examples have their heads glued on. Squadron and National patches were
printed on a ink jet printer and applied as custom decals to the pilots arms.
The navigator was hacked up joint by joint and reassembled Steve Osten style, to
be in a position looking over back over his shoulder. This took a lot of work
and looking at the result. It was definitely….a waste of time.
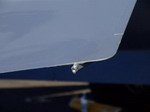
Going
for some more personal touches. I decided to scratch build some detail into the
kit. Mainly some static dischargers on the Tail plane and rudder. These were
made with some electrical wire cut to length and glued between the upper and
lower tail plane halves. Describing wire static dischargers as “scratch
building” is like being shat upon by a bird and calling it a rain shower but I
am sure you will allow me a bit of poetic license. Either way they certainly
looked the goods and improved the appearance of the machine. The
dischargers were very venerable to being knocked off when the aircraft was
handled, but I knew they were there and I am careful (Insert H-13 flat red paint
dropping clause here). I also made a few custom antennas and lumps and bumps
applicable to RAAF F-111G’s. Going through my reference photos it is amazing
how antenna vary from time to time and even from machine to machine. The Earlier
RAAF “G’s” were different from later “G’s” and both different again
to the “C’s”
Now
what am I going to hang off this thing? I brought a set of aftermarket resin
drop tanks. I brought these online from Roy
at ModelOZ Kits and Decals.
Roy
is a Ebay seller in Australia and I have found him a very good
supplier. He has a uncanny ability to always
hold exactly what I want, exactly when I want it. The drop tanks were made by OZ
Mod’s. They are a better shape than the Academy kit tanks, but the ones I
received were elliptical in cross section, not completely round. This lead to
more sanding and filling. When you look at the good quality of OZ Mods MB326
wing tanks I am sure I just got a average batch of pig tanks.
The
F-111G’s are mainly used for training by the RAAF. They don’t have the
Pave-track laser-target designator pod that the C’s have so I decided to hang
a set of unguided MK-84s off her instead of a laser guided set. These bombs came
from the “Hasegawa Aircraft weapons set A”. Opening this box and having a
glance in it all I can say is that the Japanese sure know their bombs. But then
again lets face it, they should.
A
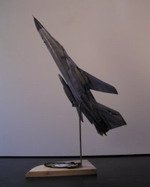
small hole was cut in the bottom of the fuselage for the “stick” to go in.
A
set of main landing gear were cut to form a bracket for the stick to sit
in and hold the aircraft in the correct aggressive position.
Looking
at reference photos, the top of the pigs nose appears to be flatter than the
kits. With a more pronounced edge compared to the kit rounded nose. I made a
flatter nose top with a piece of scrap plastic and molded it with some Tamyia
putty. I suspect this is due to the aircrafts time with the USAF when they had
some sort of GPS antenna or some other devise of the dark arts mounted here.
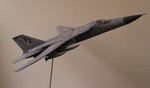
Painting.
Ahhh painting. It was decided long ago that the aircraft was going to be painted
as A8-272 with the RAAF’s 6 squadron. This aircraft actually served with the
USAF, but was withdrawn from service and put in the AMARC’s Bone yard. This pig
was sold to the RAAF, brought out of the bone yard and put back into active
service. This was the only F-111 Australia
received that was actually brought out of Desert retirement. It was
endowed with a wonderful tail marking of a skull wearing a cowboys hat and named
“The Bone yard Wrangler”. Apparently the former 6 Squadron CO thinks he
would have a mutinee on his hands if he ever tried to remove it. Some believe it
was this aircraft come back that was the inspiration for Silvestor Stallions
latest Rocky movie.
Speaking
of which, some things never change. Most hobby shops stock paint. Most hobby
shops stock a wide variety of paint. Most Hobby shops stock the same amount of
paint for each color. Most aircraft model kits are Grey. Most hobby shops are
out of grey paint.
There
was no H305 grey paint in New Zealand, infact there was no types of grey acrylic paint in any brand full stop.
Plenty
of H13 Flat Red in stock. Some sources of mine in
Australia
manage to get 5 bottles of H305 from a homeless man asleep in a public toilet
in Sydney. Greatly appreciate it fellas.
I
am big on scaling. Have a look at a decent landscape painting and the first
thing I look at scaling. The use of lighter colored paint for items further away
in the distance and darker paint for items closer to you is very effective. The
same is used here on my plane. I mixed 50% white to 50% grey for the base coat
for the aircraft. Working off a email from Gary Wickham offering advice on his
painting technique. I used a mix of 25% white to 75% grey for shading and
thinned it allot more than the normal coat. This worked great. The aircraft has
a uneven color to it and adds detail and definition to its shape and panels.
I
need allot more practice, but at least I am pointed in the right direction.
Thanks Gary.
The
aircraft colour is allot lighter than a real pig. The Pigs are very well looked
after by Boeing Australia in
Queensland. If anyone has seen one of these F-111’s recently, they look better than they
did when new! Faded paint is not the norm here. However for the Bone yard
wrangler we will make an exception. During painting I managed to knock off most
of the static discharges…Sigh.
A
top coat of future went on. I use Klear floor polish as there is no Future in NZ
(No comment). Finally a painting product I can safely drop on the floor!
I can
see what it is meant to achieve, but I have big troubles with it running
and often return to the model with little tears hiding on some part of the
surface I didn’t see when I left it. These can be removed with Window cleaner
and a cotton tip. I Might use allot less Future next time.
Time
for the decals! Now as you can probably tell by now. I’m not one to hold a
grudge. I defiantly don’t hold a grudge for more than 30 years. I’m 347
months old at the moment (that’s 28 years for those without a calculator
within reach) I do have a grudge against Aussie decals. As a young kid, my
limited pocket money went into Buying a brand new set of 1/72nd Royal Australian
Navy 75th Anniversary Sea King decals for $15AUD. Two whole weekends
work. There I stood covered from head to toe in sweat, barkers eggs and grass
clippings with a look of horror on my face as my brand new decals broke up into
a million slimy pieces. They disintegrated. Straight out of the packet into a
blue sludge. Old decals do it. Cheap decals do it. It has happened to us all.
But brand new decals just manufactured! I took a big step for a kid and wrote a
polite letter to them asking what happened and what they can do about it. 20 odd
years later and I am still waiting for a reply. I still have a plane white sea
king sitting in a box somewhere waiting on decals, and they wonder why they have
a hard time staying in business.
So
with some childhood issues pushing me to the emotional brink, I tentatively
tested the water (excuse the pun) and put my first Aussie Decal back into the
deep end of the big modeling pool. It worked fine. Infact they all worked fine.
I was greatly relieved. They came out
great! I am willing to forgive…..But I will never forget.
With
that I would like to send my regards to Clayton Fiander and all the good work
done at Hawkeye decals. I have a Ringed binder full of your fine decals and I
have big plans ahead.
The
static dischargers were knocked off during decal application.
Another
coat of Future over the decals and it was time for some weathering. I suck at
weathering, that is the official term used by the IPMS I am told. But it was my
first attempt in a long while so I see it as more of a learning exercise than a
display of perfection. I used a fine Tamyia smoke enamel wash to define the
panel lines. The engraving is so shallow on this kit that when I removed the
wash the results were no different to when I started. I wasn’t overly worried
as the real Pigs don’t have strongly defined panel lines anyway.
Click on
images below to see larger images
I
bit of Lamp Black oil paint down the blunt end of the aircraft and a touch of
Burnt Umber where the engines would leak bodily fluids and the results were good
enough to offend Greenpeace. Out with the pastels. I shaded the wing sweep areas
with pastels, as well as other areas of wear and tear such as cockpit window
sills. Smudge it up a bit with a brush or a damp cloth. Now wipe it back in the
direction of the Airflow so it develops nice flowing streaks…….Oh bugger
there go the static dischargers again.
Finally….
A coat of flat clear paint with the smallest hint of grey paint in it to give it
a even weather color. And then stick the Antennas on and I'm done…
It
was at about this stage something remarkable happened. The Royal New Zealand Air
force had a open day. Now for those of you that don’t know, the RNZAF is about
as potent as being whacked with a wet newspaper. They decided to sell off their
Skyhawk jets and replace them with…..well nothing. So the front line aircraft
of the RNZAF is a squadron of two Boeing 757. Now before you laugh, I will have
you know that they are painted Grey. So watch out. Now having a thing for
aircraft painted midway between the Black and White spectrum, I thought I
would attend the open day. Low and behold what was sitting there as the main
attraction of the open day. A magnificent example of the RAAF F-111C.
I
quietly walked around the aircraft mentally cross checking oil stains and panel
lines as us modelers/hoarders do. I was also feeling decidedly old at finally
seeing a Air force jet pilot that was clearly younger than me. I walked around
to the back end of the menacing looking machine and spot something not quite
right out of the corner of my eye. Now I’m as blind as a welders dog, but this
was standing out boldly to me. I walk up closer to the back of the aircraft and
had a long hard look. Someone had knocked one of the static dischargers
off the tail plane of the real life pig.
Maybe
our 1/1 scale lives aren’t that different to our 48th scale life
after all.
Matthew
|