|
Now, go on to this
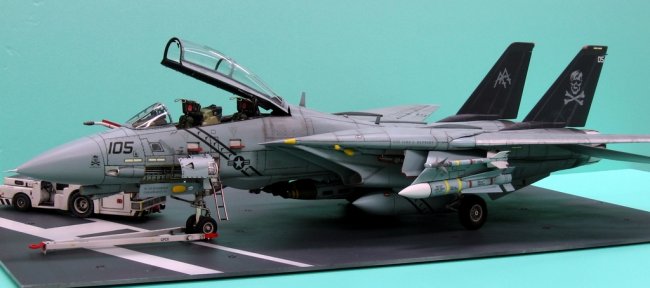
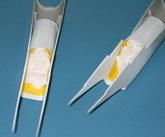
part two. The outer surface of the engine mount was covered with a GRP look decal.
It is not very noticeable even in photos of the real Tomcat. However, it is
really GRP and not black. Also the new engine discharge pipes were made and inserted
into the kit pipes so as to cover the two ugly seams on both left and right
positions. The new pipes were made by a styrene sheet, with lines cut, painted,
and then rolled to a circular shape. There is still one seam, which I put it on
the top position.
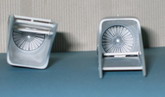
The landing gears were all enhanced
with the pipes (photo etched parts) supplied with the Eduard set. They really
looked good.
Click on
images below to see larger images
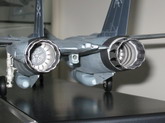
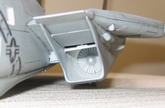
The most ugly part would no
doubt be the intake duct. There was no way that I could live with it, but
to scratch my own. My method is like, or actually is, making a sheet steel
conversion duct for air conditioning system. On one side is rectangular,
the front, and on the other side at the compressor fan, is circular. I am
very sorry that I forgot the dimensions, but it is easy to work it out.
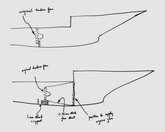
What you have to do is to make a fan shape sheet. My sketch gives you the
idea to do the dimensions and the fan shaped sheet. It is like dividing
the ducting into very narrow segments. For each 5 mm segment on the
compressor fan side, there is a transformation to 5 x F mm on the intake
side. Adding all the narrow segments together side by side, you will have
a fan shaped sheet. Rolling this sheet you will have the duct.
Do a paper one first, try if
it fits the fan and the intake. Then make one with 0.25 mm thick WHITE
plastic sheet. Roll it up, and attached it onto the compressor fan by CA
glue. Add some thin sheets onto the Tamiya duct as support on the
compressor fan side. Put the duct onto the Tamiya duct, press on the
intake side until it forms a rectangular shape (the bottom, the left and
right). Apply CA glue from the back around the intake so as to fix the new
duct onto the Tamiya duct, keep pressure for five or eight minutes until
it is really fixed and the rectangular duct is formed. Then add a 2 mm
strip onto the top of the new duct, press on until it forms the top of
the rectangular duct. That is it. Apply putty on the matting surfaces, and
make these good. When it is sanded smooth, put tissue paper into the duct
to seal the compressor fan. Spray white and you know all the work is worth
it.
Click on
images below to see larger images
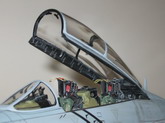
The last would be the canopy
frame. Again it was a mix of the kit parts, Teknics set and scratch build. I
found that the frame made from the Teknics parts for the rear part of the canopy
frame was not possible to be put onto the Tamiya frame. Maybe it was just me.
As it is on the bottom part, I gave up using it.
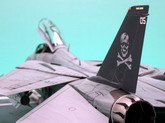
I hope you like my
Tomcat. I have the full size progress photos store in another web page. If you
are interested, please have a look at here (feel free to download too) :
http://picasaweb.google.com.tw/elainedouglas320/132F14B
Douglas
Click on
images below to see larger images
|
|