|
Kit: Tamiya P-51B
61042
Addition:
Construction:
I decided that I
wanted to build another Tamiya P-51B to replace the one I built about five years
ago, I was not happy with the finished outcome. I sent Calum an E-mail and placed
an order for two P-51B's and two more P-51D's, seem to be going though a Mustang
stage. When the kits arrived in the post I went to work I normally have around ten
kits on the go at any given time and starting this was no exception. The last
P-51B I built, I used the Eduard cockpit set. This time I wanted to use the
Aires P-51B cockpit set. With that in mind I sent Craig at Aeroworks and E-mail
to order the Aries cockpit. While I waited for the cockpit to arrive, I set to
work on stripping the decals and paint off my old P-51B, ready for a
new look. When the Aires cockpit arrived in post I started the
build. I set to
work on making room for the cockpit to fit in the kit, I removed all of the
detail on the insides of the fuselage halves with my sanding drill, once
completed, I re-scribed the entire kit like I do and then started on the
Aires cockpit. I painted the cockpit in Model Master Cockpit Green with
black boxes, with a dry brush of sliver over the top. The cockpit was now
ready to dirty up, I used the Tamiya weathering Master set B great stuff, to add
some depth and life to the cockpit. Once I was happy with the dirty grimy
effect I sealed the weathering wash by airbrushing some matt clear
over the cockpit. Now it was time assemble the cockpit with the fuselage halves,
unlike other Aires cockpits that I have used, this one went together and fit
into the kit with little fuss. In the past I have found that with an Aires
cockpit I normally have trouble assembling the two halves of the kit together
and end up with a substantial gap around cockpit halves. But in this
case the kit halves joined almost seamless and the rest of the build went almost
flawless.
Click on
images below to see larger images
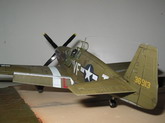
Paint:
I painted the
overall kit in Model Master Aluminium Plate followed up with Model Master
Olive Drab 34087 and Neutral Grey FS3621. After the paint had dried, I gave the
kit a wet rub to expose some of the Aluminium Plate underneath and then
airbrushed a layer of Gloss clear ready for the decals. I liked the decal scheme
Shangri-La and since I was building this one to replace the other kit also
Shangri-La, I went with the same decals. Shangri-La was flow by Capt. Don S.
Gentile 336th FS/ 4th FG 1944. Once the decals were applied, I covered the kit
with a layer of Gloss clear to seal the decals and prepare it for the pastel
wash. Now that the panel lines were highlighted, I sealed the Pastel in with an
other coat of clear followed up with a coat of matt clear. I then used the
Tamiya weathering set B to add exhaust stains, gun stains and to dirty up the
wheel well, and sealed them with a light coat of matt clear.
Finish:
It was time to add the finishing
touches landing gear + doors and cockpit window. The first P-51B I built I
stuffed up the cockpit window and could not display it opened, I made sure not
to make the same mistake again this time.
Thanks:
- To Steve Bamford again for all
his work with the ARC
- To Calum for all the kits I
have received off him lost count. Pay Calum a visit at www.gibstuff.net for
a great look at kits for sale, kits Calum is building and photos of aircraft
and ships.
- To Craig from Aeroworks for
the Aires cockpit and Ultracast seat drop Craig an E-mail for a product list
for mail ordering aeroworks@iprimus.com.au
Alan
Click on
images below to see larger images
|
|