|
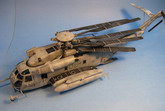
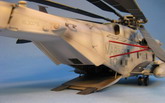
This is my Academy 1/48 CH-53E
helicopter model. It was built out of the box using MAW decals.
Out of the box, this kit provides
a very good level of detail inside and outside. The cockpit has
exquisite raised detail on the instrument panel and the bulk heads; the
interior cabin is fully detailed with the molded-on wall details, floor
details, ceiling details and passenger benches; the main rotor head
is a model unto itself. The only detail missing was some harnesses for
the pilot seats. Overall, the fit was pretty good. I used
some putty when joining the fuselage halves and around the canopy, but
otherwise there were no major headaches during construction.
Click on
images below to see larger images
Most of the the
CH-53E in service today wear a three tone grey camouflage, and that is the
scheme I chose to do. I want ed to finish this model as if it's been
used heavily faded under the sun with the weathering focused on a sun-bleached
look rather than dirt. So I went to work using my trusty Eclipse airbrush.
First I used Eduard
paint mask (highly recommended when building a model with so many windows) to mask all the
clear parts. All the parts that will be covered by the grey camouflage was
given a layer of flat white. Then pre-shading of flat black over the panel
lines was done. Then another layer of flat white to tone down the black.
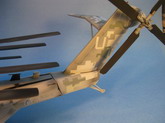
The three main
camouflage colours were NOT used straight out of the bottle. Each of
them were diluted heavily with flat clear, flat gloss and thinner to make a
translucent mixture (all Gunze acrylics). When this mixture was
sprayed on the whitened airframe, the underlying white and pre-shading would
still show through, hence giving it a sun-bleached look.
Some random patches
of white and greys were sprayed on various spots of the model, then blended in
again with the camouflage colour. This gave the model a weathered look yet
still look natural with the paint job.
When the camouflage
was done, I used Tamiya smoke to post-shade the panel lines again. The
engine exhaust tubes were painted with Alclad jet exhaust.
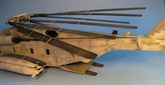
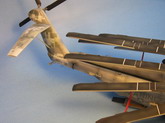
The rotor
blades were painted Gunze tire black, which is sort of an off black.
Then a very thin layer of flat white was randomly sprayed across them.
Then I used Tamiya smoke to blend in the white with the overall tire
black. This process gave the black rotor blades a sun-bleached
look.
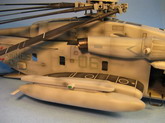
After a
gloss coat was applied, I started applying the decals. The MAW
decals were very thin and reacted very well to Solvaset. The MAW
decals set came with black walkway decals as well, but I chose to use
the kit walkways instead. In hindsight I should have used the MAW
walkways because they were thinner and wrinkled less. The
walkways were given the same sun bleaching treatment as the rotor blades
via flat white and Tamiya smoke.
Another gloss coat to seal in the
decals, then the model was given a panel line wash. Finally a coat was
applied.
When I removed the paint mask, I
was very happy to see the effort I put into painting yielded very good
results. The light, sun faded colours were exactly the look I was aiming
for, and all the weathering was part of the paint job (no pastel chalk was
used).
Overall, this is a very good
model. It's a complex build but the model was engineered superbly by
Academy. Highly recommended.
Terry
Click on
images below to see larger images
|