|
HISTORY
The fateful memory
of August 15th 1976 remains alive in Capt. Patricio Mosquera´s mind, an
aircraft pilot who led the search for a Vickers Viscount
785D operated by SAETA, the flag Airliner for Ecuador in that time,
which was on an scheduled flight while enroute to Cuenca, from Quito.
Capt. Mosquera
remembers that morning: - "Take off was scheduled at 07:00 but a technical
failure delayed the flight for about an hour and a half. At 08:20 Capt. Marcelo
Alemán and his co-pilot Guillermo Burbano, both very good friends of
mine, asked the control tower for authorization to take off. After
track 17 was cleared the aircraft took off normally heading
South"... - Mosquera said. He said additionally that the
communication
was perfect and clear.
..."Besides,
Capt. Burbano and Capt. Alemán informed us that they have just flew
over and made contact with VOR of Ambato and Riobamba, respectively. This
could have been about 30 minutes after they took off"... "A
few minutes later we lost communication with the pilots. It was about 09:00 when we
were trying to recover contact with them, but none of them ever answered
our radio-calls"... That moment the aircraft was declared in
emergency and Capt. Mosquera, together with other few more pilots started the
search of the plane.
Unfortunately bad
weather, bad climate conditions and low visibility, besides to different versions
from people who said that they saw the aircraft heading to the Amazon, didn't
allow the search of the plane to succeed and the task of searching for the plane was
suspended by three more months. "That's the way it has to be" - Capt.
Mosquera said; - "On that route, the only obstacle existent is the
Chimborazo Volcano (20,700 ft. sl), and as it seems, they had to end their
lives over there, just doing what they most like to do...".
26 years later,
February 18th 2003 and due to a sudden deicing from the top of the Chimborazo
Volcano, the remains of the SAETA´s Vickers Viscount 785D were found together
with the rest of her crew and passengers and many other things that confirmed
it was the Vickers Viscount operated by SAETA. One of the mountaineers who found
the wreckage said that they found pieces of news paper dated August 15th 1976.
This is my second
time on ARC and all I have wanted is to show a model about the aircraft that
crashed that day over the Chimborazo in memory to the families of
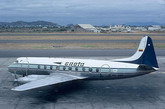
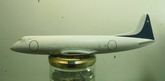
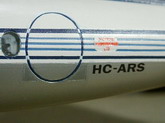
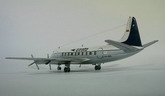
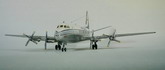
the victims involved in that fatal accident. I have included a picture
of a real Viscount similar to that one that crashed over the volcano,
the only difference is the S/N on the plane: mine was HC-ARS. The real plane
on that picture also crashed, but the picture was taken on the platform of
the Simón Bolivar International Airport of Guayaquil. The second main city of
Ecuador.
CONSTRUCTION
Click on
images below to see larger images
I remember buying this
model in 1996 in one of the local toy stores when they used to bring a
good variety of models from different brands. Among them was the Glencoe Models
and of course was the Vickers Viscount. Since then, the idea has
always been in
my mind to make a model similar to the one in which I flew
as a passenger when I was just an 8 or 9 year old kid. The operator
I flew with was SAN, another national company that merged with SAETA in 1995
or 6. Nowadays both companies no longer exist since 2000 when the
economic depression in Ecuador made these companies to close their doors.
I'm making the SAN´s Viscount as well, but I'll post it on ARC
when it's ready.
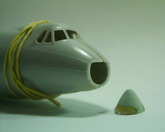
I started with the
nose of the model. All of the Viscounts beginning with the "700D"
series had an extension on the nose for housing the radar. The Glencoe´s
includes only the early Viscount shape that were used by many companies in
the world like Capital Airlines. Those versions were not yet equipped with radar.
The Viscounts from the 700D series had 8 more inches added to the nose in order
to place the radar equipment. To make the conversion I eliminated the original
nose which measures exactly 0,2 mm. Then I did another cut in the nose
of the model counting only 0,2 millimeters back from the original panel line in
the nose (this total represents the 8" added to the fuselage to fit the
radar equipment). Additionally while cutting the nose I was concerned to leave the
typical lip on the upper nose to fit the radar cone hinges.
To replace and to
make the enlargement to the Vickers nose I used the spinner from
an old 1/48 P-51 Mustang. I had to fill it and sand it until I got the
final shape, but it worked and fit perfectly at the end of the day.
Click on
images below to see larger images
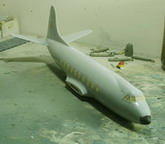
After gluing each window in
place and after I placed the proper amount of weight in the nose to allow the
model to stand right and after gluing and aligning the stabilizers together
with both sides of the fuselage right and left from the inside, I closed
the model and glued the new nose to it's position. After that I sealed
the joints with CA as well as the rest of the joints in the fuselage. After an
hour or so the CA was completely dried and ready to sand and polish the plastic.
I proceed to mask the windows using Tamiya´s masking tape. Now the model is
ready to paint. Here's when the challenge comes, folks, Oh Boy...!! The wings
and Jet prop nacelles were left apart for the final construction, detailing
and Silver painting process respectively, because at this stage I was really
concerned about painting the fuselage, the decoration lines and the
security lines on doors. Let me tell you that painting those lines on the
fuselage was to me like a teacher, when he orders his alumni to repeat
a hundred times the same homework when this was done wrong....fiuuuu!!!...I
forget to tell you that this is my first model entirely painted. I mean no major
decals were used to decorate the model. A real challenge, isn't it??...Decals
are home made, this time I did a good job printing and varnishing
them. But at the end the Vickers looks very good.
Click on
images below to see larger images
PAINTING
The paint used to dress
the model was first White of course. I did use the Revell Email Color SM-301 for
the upper fuselage. The radar cone was painted Revell Color SM-371 Gray mixed
with a bit of white to get the real tone. Using Tamiya's masking tape,
I covered the tail plane and painted it with Revell SM-350 Blue which matched
with the blue color on the real SAETA's Vickers. After that I painted the security lines on the
door's face with
the same color.
Once this part was
done, I painted the three thin lines on the fuselage between the darker blue
lines. This was done using Humbrol #109 tinted with a few drops of white
to achieve the proper color tone. Then I masked the Emergency windows (4,
6 and 9 on the left side and 4, 6 and 10 on the right side) and made some tiny
oval edges around these windows to paint them dark blue as well. Now
it was time to mask the model again to paint the darker blue. This means to paint
the first and the fifth blue lines with the Revell SM-350. The upper
line starts on the left stabilizer root and ends on the other
side, same point. The fifth line starts in the very tail cone, passing under the
staibilizers and ends at the same point. The challenge was to mask each one of
the tiny clear blue lines in the center of the fuselage. I had to make some long
and thinned masking stripes to mask them.
Click on
images below to see larger images
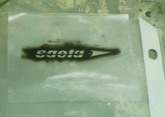
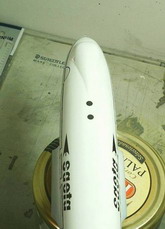
The mask for The SAETA´s logos
were made using friskit. The logo was copied from a real SAETA picture then
pasted on the Photoshop program to improve every image. I printed the designs
over regular paper fixing them to the scale first. I did insert the paper with
the designs into a transparent document folder over which I placed a piece of
friskit to cut the designs. Once each mask was ready, I placed each one of them
on the fuselage and painted the designs with black. Once the whole upper
fuselage was painted it was time to varnish the model with Microscale Satin
varnish to get a very good result with the shine of the skin. Now I painted the
lower fuselage with a mixture of two silvers, the one from Model Master Enamel
and the second one from Humbrol Color. Mixing this two silver colors gave me a
Silver not to shine so when I painted the lower fuselage it acquired the typical
shine of the metal exposed to sun.
Click on
images below to see larger images
DECALING
All the decals are
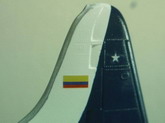
printed in my ink-jet printer. Only the stars on the tailplane are from an old
1/144 US National Insignia decal. This star represents the City of Guayaquil
where the SAETA´s headquarter was located. The rest of the decals were made by
me. Once I had all the designs ready in my Illustrator program, I separated them
in clear and white. The yellow, blue and red flag, over the tail plane and the
"Vickers Viscount Ltd." legend stencil were printed over white decal
paper.
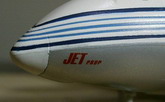
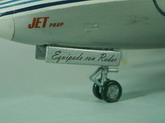
The rest of decals
like: "Equipado con Radar" (Equipped with radar) on the front gear
doors, JET-Prop on the nose, Serial Letters "HC-ARS" on the
fuselage and wings and SAETA logos on the Jet-prop nacelles were printed on
a clear decal paper.
Once the decals were
printed on each selected paper, they were coated with two light coats of Testors
Decal Bonder #9200 and I let them dry for about two days in order to let the ink
and the varnish to cure very well. I
cut every design carefully using a metal ruler keeping the knife blade
closer to each design.
Click on
images below to see larger images
I dipped the decals in water for
about 45 seconds each. The trick here was not to deep the entire design into
water. I placed every design with the backing paper in water only so it seems
the decal is floating over water. Once the backing paper was wet I did slide the
design into place and dried it with a tissue pressing down slowly to make every
decal turning into the surface shape.
Click on
images below to see larger images
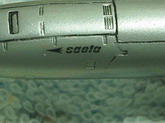
There is not any information about
what really says on the legend located on the left fuselage exactly behind the
back passenger door. This information doesn't even exist in the Vickers
Viscount Book. Sometimes it seems to say "Vickers Armstrongs Ltd."
and some times it seems to appear like "Vickers Viscount Ltd." At
first I made a decal with the first legend, but when I was placing the Serial
Letters, this legend broke down, so I replaced it with a new one with the second
legend.
Click on
images below to see larger images
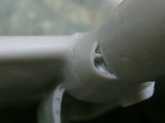
Now its time to complete the
wings and the rest of the details. Using a knife tip and a drill I carved the
engine's
nacelles in order to make the air intakes located each one on the inner side of
engines #1 and #2. With the tip of the knife, I made the inlets on the tiny air
intakes as well as located in front of each engine. Using my drills, I drilled some
holes on the main gear door sides to make them look more realistic. The
same job
was done in the main gear back doors as well. After gluing the wing
halves, filling with CA and sanding them, I glued the wings to the fuselage,
corrected the dihedral and added the rest of details like the main gear
struts, the front strut and the main gear doors. The front doors were sanded
until I got a thinned shape, then I glued three pieces of plastic card to each
door to simulate hinges. I added pitot tubes made with tiny pieces of plastic
card and hot sprue. Then I painted the wings with the same mixture of
Silver. Once the paint was cured, I placed the rest of decals on the Silver
fuselage and on the front doors and on the nose. I added the antennas and
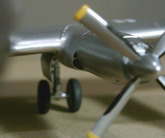
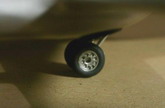
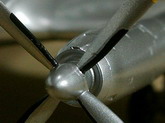
aerials and painted the props with silver, black and yellow tips. I drilled the
main wheels as well to give 'em a more realistic look, painted the tires with
Revell #9 Antracite and placed them in position without forgetting to sand them
to simulate the weight of the plane on tires. I then highlighted the details
with drawers ink and sealed the Silver fuselage with two light coats of
Future. The upper fuselage was sealed with Microscale Satin Varnish.
For
last, I placed the antenna wire using stretched sprue and painted with Steel
from Humbrol. The last detail to add was the engine exhaust stains under the
wings.
I have to highlight
the tremendous help it means to have the Vickers Viscount Book at hand. The
information contained on these pages are very helpful. I highly recommend this
book to all the Airliner modelers. Another very helpful source is the
Vickers Viscount Web page. This Web site contains information that is a
must: http://www.vickersviscount.net. I also dedicate
this article to a couple of friends of mine whose help, additional Viscount´s
pictures and valuable information made it possible for me to complete my
model. They are, Santiago Toral from Cuenca who helped me with pictures of
a crashed SAETA Vickers Viscount while landing on Cuenca Airport and
"Capt". Guido Chávez who is a very good expert on Ecuadorian Air
Force and Latinamerican Civilian and Military aircraft topics. Thank-you folks.
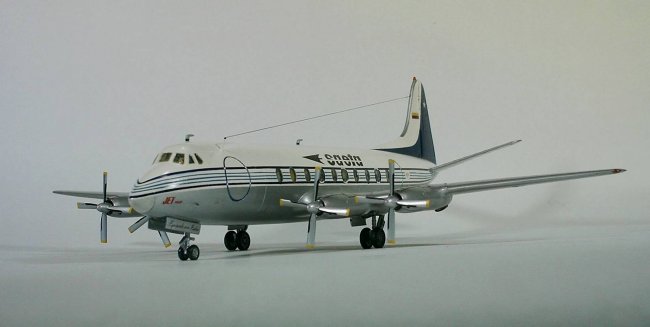
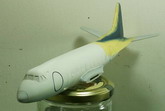
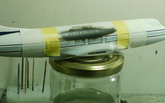
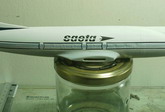
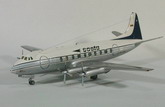
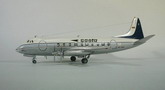
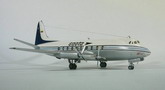
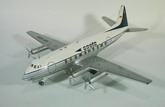
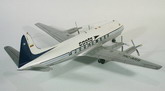
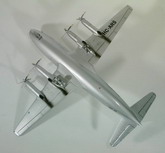
And here is the Glencoe´s
1/96 Vickers Viscount with SAETA livery. I hope you enjoyed the article
and pics. Next time I will present my second Viscount with the SAN (Servicios Aéreos
Nacionales) livery.
Happy Modeling to
you all.
José
|