|
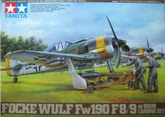
Item # 61104
MSRP- $49.00 Reviewed by Floyd S.
Werner, Jr. IPMS# 26266
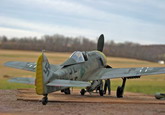
The Focke-Wulf
190F series is not as well documented as the A series.
The F-8/-9 was based on the A-8/-9 airframes, respectively, and optimized
for ground attack. The F-9 featured
the BMW801TS engine with 14-blade cooling fan and large wooden paddle type
propeller blades. The F-9 was
utilized until the end of the war. It
could carry a variety of armament including twelve 80mm Panzerblitz I ground
attack rockets.
The
model
This latest
offering from Tamiya gives you more than the previous F-8 release from Tamiya.
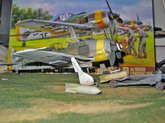
You get the typical perfectly formed light grey plastic styrene sprues.
The parts feature recessed panel lines.
A sprue of clear parts has two types of canopies included.
Some poly caps are included to allow the prop to be moved.
The decal sheet has markings for three aircraft, one F-9 and two F-8s.
The instruction sheet is typical Tamiya and easy to understand.
In this release
you get an additional sprue. This
sprue, Sprue N, gives you the additional parts necessary to build the F-9
including the larger prop blades and 14 blade cooling fan
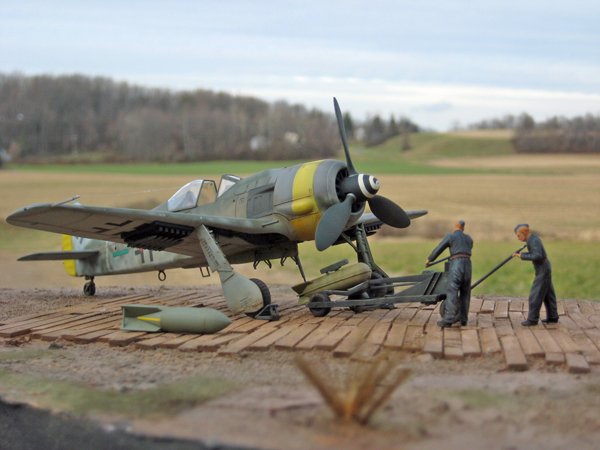
Also included on the sprue are two wheel chocks, two different style of
bombs (AB250 and SC250), landing gear covers without the lower panel, an LWC500
bomb loading cart, and two figures to operate the cart.
Another nice touch is the inclusion of a sheet with canopy masks.
Strangely you have to cut them out but they are at least included.
The
cockpit
Things start in
the cockpit as usual. The only
thing different here is that you have to remove the center panel and replace it
with a longer armament panel. Everything
else is quite nice. I painted the
interior RLM 66 with a wash of Lamp Black artist oils and dry brushed with RLM
02 and silver. Decals are provided
for the seatbelts. I left them off
until the final assembly.
The
fuselage
The fuselage fit
perfectly. It is Tamiya did you
expect anything different? The
cockpit fits from underneath and guess what?
It fit perfectly.
The
wings
You have to decide
which armament that you want to add at this time and open the appropriate holes.
I wanted to do the rockets as I didn’t have a model with them.
Just as good a reason as the next. The
holes for the drop tank mount also have to be opened.
The upper wing outer bulges also need to be opened up to mount on the
wings. Once that is done the wings
fit, well you guessed it, perfectly. The
insert panels did require just the slightest amount of sanding to allow them to
fit flush.
Offering the wings
to the fuselage represented no problem. The
fit was not perfect at the aft area under the fuselage.
I did have to fill with super glue and rescribe the panel. Nothing dramatic but it wasn’t perfect. Stop the presses and alert the media, I had to use some
filler.
The horizontal
stabilizers fit, oh heck you know how they fit.
Click on
images below to see larger images
The
engine
The engine is
painted flat black and dry brushed silver.
Can you see it? Me neither
it sits so far back. Anyhow it fit
on its block perfectly. Don’t
forget the exhausts on the side and the bottom of the wings.
The engine cowling fits perfectly.
Truthfully up to
this point I had spent about three hours on the model and was ready for paint.
This was truly amazing even for me.
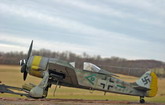
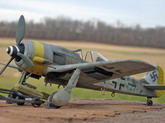
Painting
I washed the model
with Dawn dish detergent and the openings such as the engine and cockpit were
masked off. You have to cut out the canopy masks from the backing
paper. The masks were a nice touch
but having to cut them out was annoying. I
just made sure that the blade was brand new and I had no issues.
I used a straight edge where they were called for and free handed the
rest. Just cut on the line and take
your time and you’ll be rewarded with some great masks.
Then I preshaded
with RLM 66. There are some questions on what the forward cowling was
painted like. I opted for a yellow
lower cowling and a lighter colored band around the cowling.
I used Gunze RLM 04 for the darker shade of yellow on the cowling and the
rudder. After masking, Model Master
Acrylic RLM 04 lightened with flat white was added to the cowling.
Masking it off it was time to add some camouflage.
The model was then
sprayed with Model Master Enamel RLM 76. Gunze
RLM 75 was sprayed on the upper surfaces and in a mottle on the side of the
fuselage. Gunze RLM 82 Dark Green
was freehanded to the camouflage. After
the initial colors were laid down all the colors were lightened up with some
white to add some depth to the finish and break up the monochromatic look of the
camouflage colors.
I elected to paint
my spiral on the spinner as opposed the decal.
This really was just a matter of the way I normally do it.
The whole spinner was painted flat white and when it was dry I cut out a
circle for the front and then used cut Tamiya tape to establish the twist and
painted the spinner flat black.
The bombs were
assembled and painted in different colors.
The SC250 was painted RLM 02 and the AB250 was painted Panzer Yellow.
The AB250 did not turn out as nice as I would have liked, but it is okay
to use. It is engineered in four
pieces instead of the standard two piece.
Since I elected to
use the Panzerblitz rockets I painted the launcher as per the instructions with
semi-gloss black. Lacking
references I had to use the Tamiya instructions and painted the rockets with
Model Master Metalizer Dark Anodized Grey.
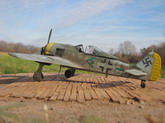
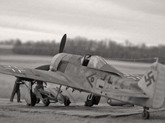
There are only two
photos that I had in my collection of the airplane I wanted to do, an F-9 Green
“Tech Chevron” of the Technical Officer for II/SG1. I
tried my best to match the camouflage pattern on the fuselage.
A coat of Alclad
gloss was added with my GREX Genesis.XT airbrush.
I love this airbrush, especially for this application.
Decals
The kit decals
looked really thick on the decal sheet so I opted to only use the stencils from
the sheet since they were designed for the kit.
For the aircraft markings I had an old Third Group decal sheet for the
same aircraft so I opted to use those decals.
I used MicroSol to wet the surface and then Solvaset for the top of the
decals. The kit and the Third Group
decals both reacted well with these solvents.
There are some decals on the bombs so don’t forget them.
A coat of Alclad
Gloss and Dullcoat were added in preparation for weathering.
In retrospect the kit decals laid down perfectly and did not prove to be
thick at all. You can’t tell
which decals are the kit’s and which aren’t.
Tamiya decals are perfectly fine and work really well.
Some
small bits
The wheels fit
really loose on the axle of the landing gear.
The instructions have a template for mounting the wheels.
I used some Tic-tac to align the strut and then five minute epoxy to
align the wheel. This ensured that
the wheels were set at the proper angle. Adding
the landing gear let me have the model sit up on its wheels for weathering.
The fit of the landing gear was a pain to establish but working with five
minute epoxy I had plenty of time.
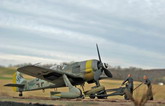
Weathering
I had already
started weathering when I lightened the camouflage colors.
I always start with a light wash of burnt umber artist oils for the panel
lines. This sets the tone for the
rest of the weathering.
Then it was time
to add the silver chipping. I use
silver pencils and the sponge technique with some Rub-n-Buff.
This was added to the leading edge and areas where the crew would have
walked.
A very thinned
coat of Tamiya Red Brown and Flat Black for the exhaust and gun residue.
This was flowed over the fuselage sides as per the reference photos.
Heavily thinned
Tamiya Buff was added on the upper surface to “dirty” up the upper surface
and to simulate mud on the underside of the wing.
I sprayed it from front to back on the wings and up and down on the
fuselage.
Finally I added
some Mig Pigments to the wheels, the landing gear struts and wing roots to
simulate the mud and grime that comes with operating from an unimproved strip.
I set it with the Mig Thinner.
This was all
sealed up with some Dullcoat.
After the Dullcoat
had dried, I used Gunze Oil thinned on the lower cowling to get the grungy look
of leaking oil.
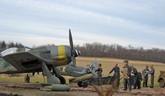
Final
assembly
Adding the
rockets, boarding step and the various antennas brought the fuselage to a
conclusion. Adding the head armor
to the canopy, add the canopy and adding an EZ Line antenna brought the whole
thing to a conclusion.
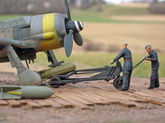
Wheel
chocks
The first thing I
elected to build was the wheel chocks. I
could never figure out why no one had ever done them before.
They are really easy and consist of two pieces each.
Paint and done.
Bomb
cart
This was a unique
addition to my collection as I never had one of these.
The construction is pretty straight forward.
I did have to sand where the arms met by the wheels but this was not
because they didn’t fit well it was just to remove the seam.
I cut off the front wheel and added some wire to the assembly.
I did this because I wanted to allow the wheel to be turned as I wanted
it.
The whole assembly
was painted with JPS RAL colors which are darker than panzer grey.
I used the panzer grey to add vertical water marks.
I added War Pig black wash to the whole assembly.
Then a dry brush of RLM 02 brought out the details.
I used the sponge technique to add some silver chipping.
The wheels and other parts were dirtied up with some Mig Pigments and the
bomb cart was done.
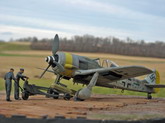
Figures
The figure
represented no big problems. They
fit together really well. Each
figure has a separate head and arms. The
fit of these parts is perfect. Aligning
the arms to match the bomb carts handles was the hardest part.
The figures were painted as normal.
I painted the uniforms a very dark grey and used Lamp Black artist oils
to add the shadows. A lighter dark
grey was added to the highlights. Flesh
was painted normally. That was
about it.
Conclusion
The airplane fits
really well with no issues anywhere, except maybe the landing gear.
How can I fault a model that literally was ready for paint in three
hours? When was the last time you
heard of that? It literally took me
longer to paint the model than to build it. The
new parts are really nice and it is great to have the option to build the two
versions. The decals are very good.
I should have used all of them.
The accessories
are just as good as the airplane. I
loved the simplicity of the wheel chocks. The
bombs and rockets are really nice. The
fit of the AB250 was the toughest part of the whole kit and it wasn’t bad at
all. The bomb cart is simple, yet
effective. When added with the
figures you have a really nice little diorama.
I commend Tamiya
for this easy to build and fun to display model.
I had a blast building it all. It
was nice to exercise all the different modeling disciplines, aircraft, armor and
figures. This is what modeling is
supposed to be, fun.
Remember modeling
is fun!
Highly recommended
Thanks to Tamiya
USA for the review copy. You can
obtain your copy from your local hobby shop or online.
References
-
Walk Around
22- Focke-Wulf FW-190A/F, Malcolm Laing and E. Brown Ryle, Squadron/Signal,
2000, ISBN 0-89747-414-7
-
Aero Details
6: Focke-Wulf FW-190A/F, Shigeru Nohara and Masatsugu Shiwaku, Dai Nippon
Kaiga Co., 1993, ISBN 4-499-22603-1
-
Focke Wulf
Jagdflugzeug, Peter Rodeike, ISBN 3-923457-44-8
-
Photo Hobby
Manual #1501-Special Drawings Focke Wulf FW-190 Part 1, Radek Vavrina, CMK,
ISBN 9-788090 377844
Floyd
S. Werner, Jr.
Click on
images below to see larger images
|