|
This is in some ways an easy review
to write, as the assembly is very simple. In some ways it's rather hard as it's
a bit different from my normal kind of thing. So here's the easy part:
It's a base! It comes in a box! It's very nice!
So now the harder part. Like, I suspect, a lot of modellers I appreciate that my
stuff would look better presented on an appropriate base. However I would
rather be making another kit then spending the considerable time needed to make
a realistic looking one, and I think that's where Marc has a winner with these
bases. You could undoubtedly make something similar to some of them, cheaper (as
several of the
harder core club members commented) but that depends on your ability and how you
value your time. Personally I couldn't approach the quality however long I
spent, I would rather be making another kit anyway and an that basis I think
they're good value for money. But that's getting a bit ahead of myself, so lets
have a look at what they're like. What's shown here is only a small selection,
the current price list has 60 items in 48th and there are also a smaller number
of 72nd and 32nd scale items. There are concrete bases, PSP (3 different styles
of PSP), steel mats, brick and wood (many different plank shapes and sizes),
with some combinations, such as the brick and wood base shown. There are also
various shapes (round, t-shaped, rectangular) and sizes. As a basic product they
come unpainted but with some level of pigment in the resin
for a basic colour (pic 1) but many are also offered pre-painted (I know, I
know, it's cheating) and that's what you're seeing here.
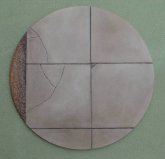
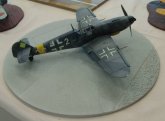
The four provided for review are a round concrete base with a strip of ground at
one side (if a round base can be said to have a side but you know what I mean)
which breaks it up a little (pic2), a T-shaped wooden plank base (pic 3), a
round PSP base (pic 4) and an strange shaped brick/wood base (pic 5) that I
thought was a little odd but Marc has done his research and sent me some pics of
this kind of thing in Holland. It would make a great setting for a Tempest
diorama! And the casting is first rate, I can find no pinholes or indeed flaws
of any kind on any of the four shown. As these were provided painted I can't
comment on how easy it is to produce the result you're seeing, but at least you
can see what they look like when some-one who knows what they're doing does it.
I'm sure I wouldn't do a good job and as such the extra cost of the pre-painted
items strikes me as a bargain. Price wise the ones here range from around 24€
to 32.5€, unpainted they're about 7€ cheaper.
There's not much else to say, there's no fit problems or off register decals to
complain about, the bases seem strong and are well packaged and I think you can
tell I'm impressed. If you want to see some more have a look at http://www.maqueweb.info/mark58_II/index.php?lng=fr
(the French version seems to have more on than the English at the moment).
And if you're interested Marc also does special orders. I met him a few years
ago at the Brussels IPMS show (a great show by the way, held every other year in
the aircraft section of the museum, it's on this year, 6&7 September and
Brussels is really nice) and we discussed a Vietnam revetment scene. Which he
has now produced for me and hopefully I will get done soon to go with the many
Phantoms I'm planning on doing (50th anniversary of the 1st flight, 27th May
1958) this year. I'm including a brief description from Marc as to how he does
his painting, hopefully it'll be of some use.
Painting is easy, it's all with acrylics, pigments or pastel chalks
First step : I develop colour shades for the resin to use these in transparency
in the painting process
This is why brick is moulded in brick red, concrete in a yellow-grey, wood in
deck tan, ans PSP in black-grey
Second step : take an acrylic clear which can be mixed 50% with water
The thinned version will be used for final finishing coat
The concentrated version will be used to mix up pigments
Step three: look for pigments
-
- natural earth pigments which
can be found in shops were they sell
household paints
-
- pigments in smaler volumes
that are available from product range for
artistic painters
-
- pastel chalks , this is what I
recommend, they are reasonably priced
and easy to find just grind these chalks
Step four: the pigment pastes
Step five: apply washes
Layers are applied in transparency(
no thick coats or dry brushing at all )
This is basically the technique
Now starts the artistic work, with the perception of colours, contrast, light,
style. The natural appearance of wood will not include brown for
instance. It's yellow, green, grey and some black for the contrast
Peter
Click on
images below to see larger images
|
|