|

1/48
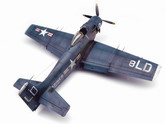
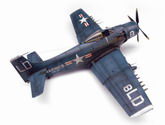
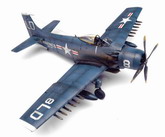
AD-4 Skyraider converted from the Tamiya A-1H kit
AD-4 Skyraider, US
Marines, Korea 1951 - Part Three of Seven
The AD Skyraider -
A
Modeling Journey in 1/48th Scale in Seven Parts
This was the third
Spad in my series and the first where I started branching out into other
variants besides the “out of the box” A-1H or J. At the time I
was planning on backdating one of my Zoukei Mura 1/32nd scale kits to the
earlier AD-4 variant and decided to again test techniques on the smaller,
cheaper Tamiya kit. (This plan was later made moot with the release
of the excellent Trumpeter AD-4 kit!)
A note: All my
Skyraider models share a few common traits. All of them (except the AD-6
& AD-5W (coming soon!), have gun barrels & pitot tubes made from
hypodermic needles. All were painted with Testor’s Model Master or
Tamiya acrylics and weathered with oils. I also used AK Interactive washes
to replicate the always present oil and fuel stains on this dirty bird.
Aerials were created with EZ Line strands. Beyond that I used a variety of
aftermarket parts & decals as described in each model’s individual
article.
A word about the
Tamiya kit…wonderful! Goes together without any drama and is very nicely
detailed straight out of the box. And it is highly convertible!!
|
Click on
images below to see larger images
|
|
|
I began by planning and
researching the differences between the AD-4 and AD-6/A-1H. The
primary visible differences are the lack of armor plating on the AD-4, no
rudder top beacon and a simpler antenna arrangement. I obtained a
decal set from EuroModels, which had the desired Korean War era Marine
markings, and also bought a CMK resin cockpit detailing set. This
cockpit is very suitable for the AD-4 as it has the proper circuit breaker
panel and early Navy style seat. The final details procured were a
set of Model Design Construction (MDC) resin fuel tanks and the smaller
pylons which backdate them to the Korean War era versions, very different
from the elongated tanks included with the Tamiya kit. I
began my carefully and laboriously sanding off the raised armor panels
from the fuselage sides and bottom of the wing. I took my time with
this, using only Squadron sanding sticks, and later fine sandpaper.
No motor tool involved! Go slowly and carefully and it is not too
tough of a job. I re-scribed the lost panel lines using my new MMU
scribing tool. This is by far the best tool for scribing tool out
there, and I highly recommend it. It’s like 10 bucks, too, so
quite the bargain. I removed the un-needed antennas to represent the
early Sandy.

After
sanding and polishing the model, I primed with Tamiya fine white primer
and pre-shaded with black. I observed that the Korea ground based
birds were usually very weathered and faded, so I started by lightening MM
Gloss Dark Sea Blue and base coating the model. I then post shaded
panels lines and highlighted the center of the larger panels with a more
faded blue. The EuroModels decals went on great and responded well
to decal softener. I attached the MDC tanks, and added the HVAR
rockets and centerline 1000 lb. bomb from the Tamiya kit to arm the Spad.
A very light spray of Testor’s semi gloss lacquer sealed the paint job.
These birds were not shiny but a totally flat finish looks, to me, rather
dead and lifeless. Exhaust stains were then done with thinned Smoke,
and topped with a custom grayish mix to go over the Dark Sea Blue. A
very satisfying model and I was now officially hooked!
In part
four, we fold ‘em up and make it colorful!!
Vince Pedulla
ModelerV
Studios
|
Click on
images below to see larger images
|
|
|
|