|
I have been wanting to build a Royal Air Force PUMA HC1 for some time.
I remember seeing the old Matchbox kit when it first came out years ago, and wanted to use this kit to build one.
Matchbox is long gone, but Revell acquired the molds, though they have been modified to produce later, non British variants.
A few years ago at an air show at IWM Duxford, I was able to pick up the old kit from a second hand model dealer.
The kit came in three colours with colour schemes for two RAF, one French military and a French civilian machine.
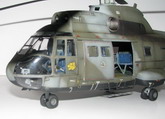
The interior details were basic so I set about adding detail using plastic card, various gauges of wire and odds and ends from the spares box as there are no after market sets available.
Though the kit featured molded on sound proof quilting to the cabin interior, it was too thin, and covered in mold ejector marks, so I replaced it using Milliput & Green Stuff epoxy putty. The quilting pattern was added by pressing wire mesh into the still soft putty.
I also had to build a ceiling panel from plastic card and putty.
The troop seats had belts added.
|
Click on
images below to see larger images
|
|
|
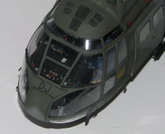
The cockpit was extensively detailed as due to the large clear canopy a lot is visible.
The seats were padded out with Green Stuff, and seat belts were added using metal foil.
The instrument panels, and consoles were detailed with Airscale decals for the dials & placards.
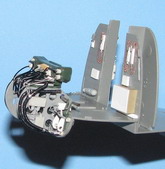
The rear of the instrument panel was detailed by adding the rear of the instruments, using sprue and rod, and having the wiring looms fabricated from lead wire and solder.
Various junction boxes were fabricated from thick plastic card, and reshaped blocks of resin pour stubs.

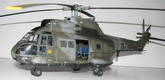
The exterior featured fine raised panel lines, which I re-engraved, and fine rivet detail.
I also opened up various vents and apertures, and replace the tail boom's molded vent with a piece of etched mesh.
The undercarriage had brake lines added from wire, as well as tie down loops.
The engine exhausts had the drive shafts that pass through them to the gear box added using plastic rod, and I also added turbine faces to the intakes using parts from the spares box.
The rotor hub had various pipes and wires added using more wire and solder.
The model represents a Puma how they first appeared in RAF service, before all the airframe modifications and upgrades that added numerous lumps, bumps and other boxes to the fuselage.
I used Xtracolor enamels to paint the model and gave it a light weathering.
The decals are the kit's ones, which were a bit of a problem as the grease proof paper cover slip had stuck to them.
I managed to salvage most of them, replacing the ones beyond help with decals out of my spares
stash.
Angelo
M Picardo
|
Click on
images below to see larger images
|
|
|
|